
How to create your first sketch in RouteSketcher
GPS art (also known as Strava art) is the creative practice of planning and running/cycling routes that form recognizable shapes, letters, or designs when viewed on a map. GPS drawing art has become increasingly popular among athletes who want to add creativity to their workouts.
This tutorial will guide you through the process of creating GPS art/Strava art with RouteSketcher, the best app for GPS Art planning 😁. Follow along to master the art of creating stunning route designs that transform your runs and bike rides into art 🏃🚴💨.
Looking for inspiration first? Our Strava art guide has real examples, shape ideas and tips for drawings that look clean.
🎥 Video Version:
Watch this guide on Instagram
Step 1: Access the Map
Once logged in, start by selecting App -> Draw from the main menu. This will take you to the map view, centered on your current location.
Step 2: Select Drawing Mode
Once you're on the map, locate the toolbar on the left side and select Draw Mode. This will activate the drawing tools.
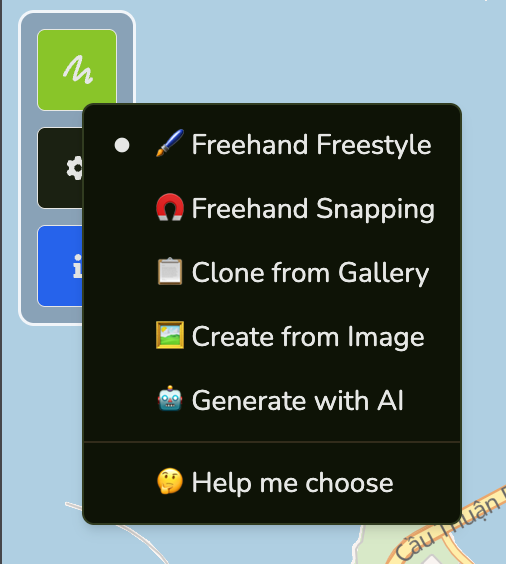
Step 3: Choose Freehand Snapping
From the drawing options, select Freehand Snapping. This mode is perfect for city routes because it automatically snaps your drawing to the road network, ensuring your route follows actual roads and paths.
Step 4: Draw Your Route
Click and drag on the map to draw whatever shape you want. The freehand snapping will automatically snap your drawing to the nearest roads, so you don't have to worry about staying on track. You can draw anything: a simple loop, a heart, or something more complex. Keep it as one continuous line, and you're on your way to creating GPS art that'll look great on Strava.
Step 5: Review Distance Estimates
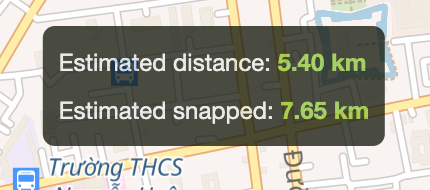
Now, you should see two important metrics at the top:
- Estimated Distance: The distance of your original drawing
- Estimated Snapped Distance: The actual distance of the route after snapping to roads
Step 6: Edit Your Route
If you want to refine your route, select Pause to enter edit mode. You'll see new handles appear that allow you to:
- Move the entire route
- Scale it up or down
- Rotate it to a different orientation
Step 7: Fine-Tune Individual Points
For more precise editing, enable Edit Points mode. This allows you to:
- Move individual points to better positions
- Delete unwanted points by clicking on them
- Add new points to increase definition
Step 8: Preview Your Route
Once you're satisfied with your edits, you can preview the final route by hiding the sketch line. This shows you exactly how your GPS art will appear when you run or cycle it. Whether you're creating running GPS art or cycle GPS art, this preview ensures your Strava art will look perfect before you hit the road.
Step 9: Save Your Sketch
When you're happy with your route, click Save and give it a name. For example, "Gandalf run in Amsterdam" or "Weekend Doggo ride in Da Nang".
What's Next?
Now that you've created and saved your GPS art, you can:
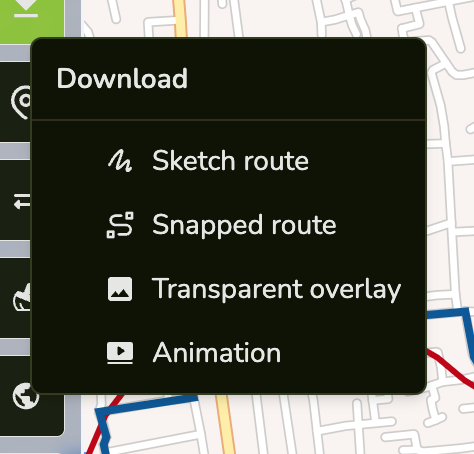
- Download it as a GPX file to use with running apps like Strava or GPS tracking devices such as a Garmin watch, Suunto watch, Apple Watch, or Coros Watch. Once you have your activity recorded, upload your GPS art to Strava to showcase your creation 🎨. Check out our Garmin export guide for detailed instructions on getting your GPS art onto your device.
- Make it public to share your GPS art with the RouteSketcher public board and inspire others to create their own GPS art.
- Download a transparent image overlay or video for social media - Share your creation online or make a creative edit alongside your Strava result.
Tips for Creating Amazing GPS Art
- Use Freehand Snapping in cities: This mode works best in urban areas with dense road networks, making it ideal for creating detailed GPS art and Strava art designs
- Review Before Saving: Always preview your GPS drawing art and make adjustments before saving to ensure your Strava art looks perfect
- Check Distance Estimates: In snapping mode, make sure to check the snapped distance, as it's the closest estimate of the path you will follow
- Take Your Time: Don't rush the drawing process. Fine-tuning your GPS art will result in a better final result that stands out.
- Start Simple: If you're new to GPS art, begin with simple shapes before attempting complex GPS art designs
Ready to create your first GPS art? Start sketching now and join thousands of athletes turning their workouts into shareable artwork!